GoAccess的安装和使用
由于Hexo是静态的,无法动态为其统计文章访问量,第三方服务我又害怕不稳定。于是我想到了Nginx的日志。日志是个好东西,记录了网站的所有请求和返回状态等等。所以我就找到了名为GoAccess的日志分析工具,它支持多种日志格式。
安装GoAccess
在你喜欢的目录创建如下日志格式配置,文件名如nginxlog.conf,由于我用了宝塔面板,其Nginx设置的日志格式转成GoAccess如下。
1
2
3
| time-format %T
date-format %d/%b/%Y
log_format %h - %^ [%d:%t %^] "%r" %s %b "%R" "%u"
|
如果你是使用的原生的Nginx,日志可能有所不同。请下载脚本把Nginx格式的日志转换成GoAccess适配的日志。然后执行如下语句
1
| LANG="zh_CN.UTF-8" bash -c "goaccess -f /www/wwwlogs/looyeagee.cn.log -p ~/nginxlog.conf -o /www/wwwroot/looyeagee.cn/report.html --ignore-status=404"
|
其中-f是指定日志文件位置,-p是指定刚刚的日志格式配置文件位置,-o是指定输出位置,--ignore-status=404是忽略404结果,因为404大多是机器人访问的或者攻击者访问的失败请求,不应该将其计入最终访问量。
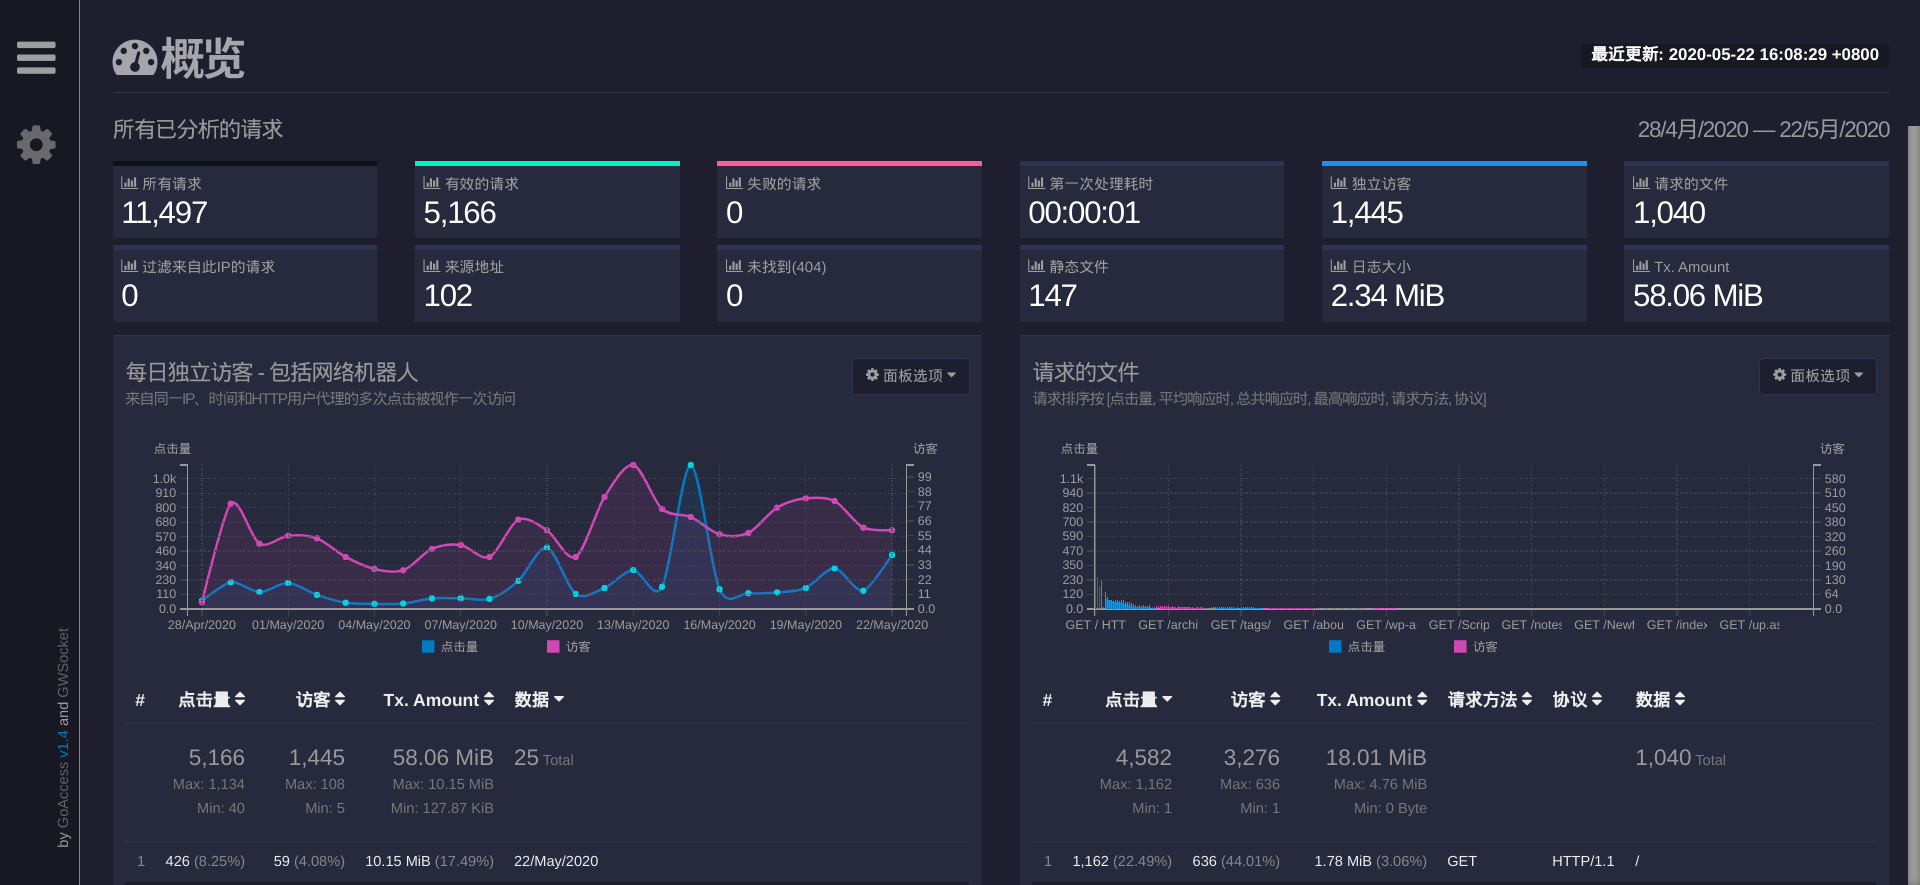
这样,我们访问这个网页,就可以得到如下所示界面:
![图1:报告截图]()
统计还是挺全面的,但是这似乎并不合适我们用JavaScript来读取访问量,查看官网文档,发现还有一种输出格式,也就是Json格式。将上面的生成报告命令改成:
1
| LANG="zh_CN.UTF-8" bash -c "goaccess -f /www/wwwlogs/looyeagee.cn.log -p ~/nginxlog.conf -o /www/wwwroot/looyeagee.cn/report.json --ignore-status=404"
|
即可生成json报告,其中概况信息的字段是general,内容如下:
1
2
3
4
5
6
7
8
9
10
11
12
13
14
15
16
17
18
19
20
21
22
| {
"general": {
"start_date": "28/4月/2020",
"end_date": "22/5月/2020",
"date_time": "2020-05-22 16:15:41 +0800",
"total_requests": 11509,
"valid_requests": 5170,
"failed_requests": 0,
"generation_time": 1,
"unique_visitors": 1445,
"unique_files": 1040,
"excluded_hits": 0,
"unique_referrers": 102,
"unique_not_found": 0,
"unique_static_files": 147,
"log_size": 2456680,
"bandwidth": 61019738,
"log_path": [
"/www/wwwlogs/looyeagee.cn.log"
]
}
}
|
我们只需要valid_requests访问量,和unique_visitors访客量两个数据。
将访问量写入网页
在Html页面中,我们可以预留两个span标签来展示数据。
1
| 访客人数:<span id="uv"></span> | 访问总量:<span id="pv"></span>
|
我们可以用JS这样来取出
1
2
3
4
| $.getJSON("https://looyeagee.cn/report.json"),function(result) {
$("#uv").html(result["general"]["unique_visitors"]);
$("#pv").html(result["general"]["valid_requests"]);
});
|
这样我们的访问量就可以正常显示了。
给每篇文章显示访问量
虽然我们统计了访问总量和访客人数,但是每篇文章的访问数我们还没有解决,这时我查看了下它的Json,里面有个requests字段,里面的data字段记录了所有请求路径以及路径的访问量和访客数。随便拿出一个data来看一下:
1
2
3
4
5
6
7
8
9
10
11
12
13
14
15
16
17
| {
"hits": {
"count": 1162,
"percent": "22.48"
},
"visitors": {
"count": 636,
"percent": "44.01"
},
"bytes": {
"count": 1865825,
"percent": "3.06"
},
"method": "GET",
"protocol": "HTTP/1.1",
"data": "/"
}
|
hits就是访问量,visitors就是访客量,data就是访问路径。不过我发现,data可能有重复的路径,这是因为每次的method和protocol不同,这些数据都会被细分。所以我们要做的是把这些路径的hits和visitors都加起来。用python写个脚本吧,只保留我们需要的数据,顺便每次运行脚本时都更新一下json文件。
1
2
3
4
5
6
7
8
9
10
11
12
13
14
15
16
17
18
19
20
21
22
23
24
25
26
27
28
29
30
31
32
33
| import json
import os
os.system(
'LANG="zh_CN.UTF-8" bash -c "goaccess -f /www/wwwlogs/looyeagee.cn.log -p ~/nginxlog.conf -o /www/wwwroot/looyeagee.cn/report.json --ignore-status=404"')
root = "/www/wwwroot/looyeagee.cn/"
with open(root + "sitemap.xml") as f:
sitemap = f.read().replace(".html", "").replace("https://looyeagee.cn", "")
with open(root + "report.json") as f:
data = json.load(f)
result = {
"general": {
"valid_requests": data["general"]["valid_requests"],
"unique_visitors": data["general"]["unique_visitors"],
"date_time": data["general"]["date_time"]
}
}
request_result = {}
for i in data["requests"]["data"]:
if sitemap.find(i["data"]) == -1 or i["data"] == "" \
or i["data"][-1] != "/":
continue
if request_result.get(i["data"]) is None:
request_result[i["data"]] = {
"hits": 0,
"visitors": 0
}
request_result[i["data"]]["hits"] += i["hits"]["count"]
request_result[i["data"]]["visitors"] += i["visitors"]["count"]
result["req"] = request_result
with open(root + "report.json", "w") as f:
json.dump(result, f)
|
这样我们就得到了类似这样的Json文件:
1
2
3
4
5
6
7
8
9
10
11
12
13
14
15
16
| {
"general": {
"valid_requests": 5151,
"unique_visitors": 1445,
"date_time": "2020-05-22 16:00:01 +0800"
},
"req": {
"/": {
"hits": 1667,
"visitors": 946
},
"/archives/": {
"hits": 213,
"visitors": 115
}
}
|
在文章的Html里预留id为article_pv的span标签,在js中写一下即可:
1
2
3
4
5
6
7
| $.getJSON("https://looyeagee.cn/report.json?t=" + dateFormat("YYYYmmddHH", new Date()),
function(result) {
$("#uv").html(result["general"]["unique_visitors"]);
$("#pv").html(result["general"]["valid_requests"]);
var path_name = decodeURI(window.location.pathname);
$("#article_pv").html(result["req"][path_name]["hits"]);
});
|
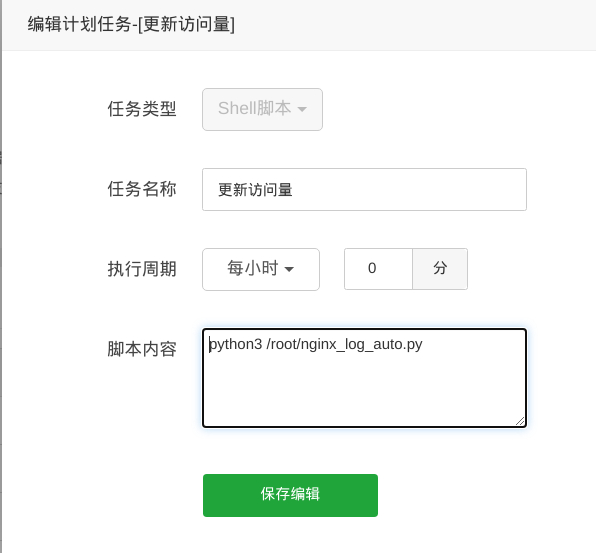
以上的dateFormat函数来自这儿,生成一个精确到小时的时间字符串以确保获取到的是最新生成的数据(怕缓存问题)。那么怎么一小时执行一次呢?去宝塔面板添加如下计划任务即可(文件路径为自己的python脚本路径),不是宝塔用户自己可以用crontab -e添加计划任务噢~
![图2:计划任务截图]()
这样,我们就完成了每小时自动更新了!且读取到的数据不会被缓存所影响。